Firmware Update via Cable - MAX PLUS IoT
This guide covers how to update the IoT module firmware via USB cable on Segway MAX PLUS scooters. There are two IoT hardware variants used on MAX PLUS; the procedure is nearly identical but uses different firmware files.
Critical Warning: Always verify your IoT model before flashing firmware. Installing the wrong firmware will permanently brick the IoT module. You can verify the model in Step 5 of this guide.
IoT Module Variants
| Variant | Module ID | Notes |
|---|---|---|
| BG96-R05 | Quectel BG96 | Check label on IoT module |
| EG95-R06 | Quectel EG95 | Check label on IoT module |
Tools Required
- Phillips screwdriver (M3)
- Tweezers (for removing decorative cover)
- Hot-air gun (optional, helps remove cover adhesive)
- USB to TTL adapter cable (see USB to TTL Cable guide)
- Windows laptop with flashing software (provided by Segway)
- Correct firmware .bin file for your IoT variant
Steps
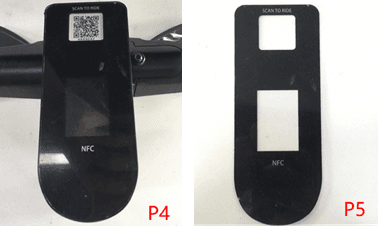
Step 1 - Remove decorative cover: Use tweezers to peel back the decorative cover (P4, P5). Use a hot-air gun to soften the adhesive if needed.
Step 2 - Remove dashboard: Remove 3 screws (M3×20) from the dashboard top and 1 screw (M3×10) from the front. Lift the IoT box up.
Step 3 - Expose the IoT module: Disconnect the IoT from the scooter wiring and carefully remove it from the housing.
Step 4 - Connect USB cable: Connect the USB to TTL cable to the IoT module's diagnostic port. Connect the other end to your Windows laptop.
Step 5 - Verify IoT model: Before flashing, check the label on the IoT module to confirm whether it is BG96-R05 or EG95-R06. This determines which firmware file to use.
Using the wrong firmware file will permanently damage the IoT module.
Step 6 - Open flashing software: Open the firmware flashing tool provided by Segway on your Windows laptop.
Step 7 - Load firmware: Select the correct .bin firmware file for your IoT variant:
- BG96-R05: use the BG96 firmware file
- EG95-R06: use the EG95 firmware file
Step 8 - Flash firmware: Click Start in the flashing tool. The process typically takes 3-5 minutes. Do not disconnect the cable during flashing.
Step 9 - Verify: After flashing completes, the tool will show a success message. Check the firmware version via the ZK600 app to confirm.
Step 10 - Reassemble: Reconnect the IoT to the scooter wiring, secure the dashboard screws, and replace the decorative cover.
Troubleshooting
- Tool does not detect the device: Check the USB connection and ensure the correct COM port is selected in the flashing tool
- Flash fails midway: Check the firmware file is not corrupted and retry
- Scooter still offline after flash: Verify IP/APN settings using the ZK600 guide
Reading Logs via Cable
You can also read logs from the IoT using the same USB cable connection. After connecting, open a serial terminal (SSCOM or similar) and monitor the output. See the USB to TTL Cable guide for setup details.