OKAI Server Configuration
This guide provides step-by-step instructions for configuring OKAI scooters and e-bikes to connect to the Levy Fleets server. Whether you're switching from OKAI's default server or setting up new devices, this guide covers everything you need.
TL;DR — The 3 Commands
If you've done this before, this is the entire process. Open ZK Tool, press Ctrl + L, and send these three commands in order:
OKAI reporting-interval AT command — partner content
Sign in with your active Levy Fleets account to view.
Sets the reporting interval.
OKAI server-switch AT command — partner content
Sign in with your active Levy Fleets account to view.
Points the device at the Levy Fleets server.
OKAI device-restart AT command — partner content
Sign in with your active Levy Fleets account to view.
Reboots the device so the new server config takes effect. Skipping this means nothing applies — the device keeps talking to OKAI.
The full step-by-step (mode switching, cable connection, verification) is below.
Common Mistakes — Read Before You Start
These are the three things operators consistently get wrong:
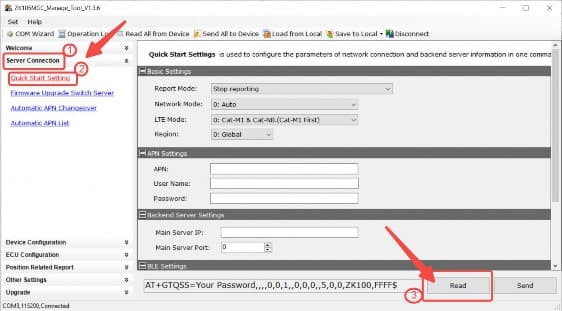
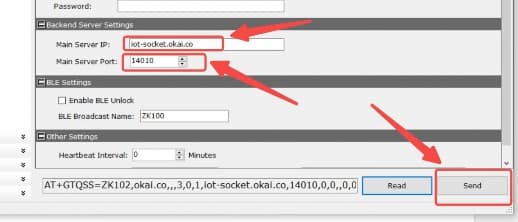
- Don't touch the "Quick Start Settings" form (Main Server IP, Main Server Port, APN fields in the main ZK Tool window). The server config is set through the Ctrl + L command pane, NOT the form. If you fill in or "Send to Device" the form, you'll overwrite the AT command settings.
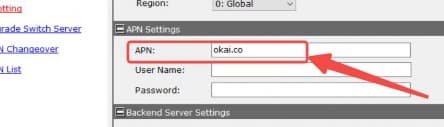
- Don't change APN settings. The APN is pre-configured on the SIM. Changing it breaks cellular connectivity.
- Don't skip the restart command. The restart AT command (•••••sign in) is what actually applies the new server config. Without it, the device keeps connecting to OKAI's server even though the commands appeared to succeed.
Required Software Downloads
Download these tools before starting configuration:
| File | Description |
|---|---|
| ZK Tool (ZK105LSC Manage Tool V1.2.4) | Main configuration software for reading/writing IoT settings |
| Modify Mode.exe | Switches IoT device between TEST and NORMAL modes |
| Encryp_Data.okai | Encryption data file required by Modify Mode |
| Prolific PL2303 USB Driver (v1.12.0) | USB-to-serial driver required for Windows 11 |
Windows Only
Both ZK Tool and Modify Mode are Windows-only applications. The Encryp_Data.okai file must be in the same directory as Modify Mode.exe to function.
Windows 11: Prolific Driver Required
This USB driver is only for computers running Windows 11, as it won't automatically recognize the COM serial port. You must install the Prolific PL2303 USB driver before connecting the OKAI USB debugging cable.
Video: How to Use Modify Mode
Prerequisites
Before you begin, ensure you have:
- A Windows PC (the configuration software is Windows-only)
- The software tools above downloaded and extracted
- Serial debugging cable (OKAI part
2011300132) - Serial port adapter cable (OKAI part
2011300141) - Access to the vehicle's IoT module
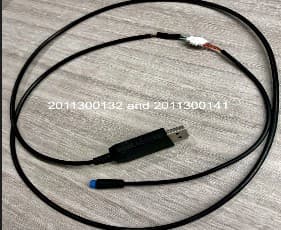
The ZK1 connection uses two cable parts
The USB cable and the vehicle-side adapter are separate OKAI parts. The
2011300132 USB cable ends in a white 4-pin plug. It does not connect
directly to the red service connector on a ZK105L module. Join it to the
white 4-pin plug on adapter 2011300141, then connect the adapter's red
keyed end to the module's red service lead.
If you only have the USB cable with the white 4-pin plug, the cable set is incomplete for this connection. Do not force the plug into another socket.
Part 1: Update Server IP and Port
This is the most critical step. You'll connect to the IoT device and update its server configuration to point to Levy Fleets.
Step 1: Prepare the IoT Device
- Power on the vehicle and ensure the IoT device is active
- Press and hold the IoT device button for approximately 10 seconds to activate it
- The device must be in TEST mode for debugging software access
LED Status Indicators
For a field-friendly troubleshooting reference, see OKAI IoT Status Lights.
| LED 1 | LED 2 | Mode |
|---|---|---|
| OFF | OFF | INACTIVE mode |
| Alternating Flashing | Alternating Flashing | TEST mode (required for configuration) |
| ON (Breathing) | OFF | Normal operating mode |
| OFF | Flashing | ECU fault detected |
| OFF | ON | IoT fault detected |
Step 2: Connect to the IoT Device
- Extract the IoT module from the vehicle housing (if necessary)
- Join the white 4-pin connector on serial debugging cable
2011300132to the matching white 4-pin connector on adapter cable2011300141 - Connect the adapter's red keyed end to the IoT module's red service lead
- Leave the module's green ECU connection attached to the vehicle
- Connect the USB end to your PC
- Ensure no other applications are using the USB/serial port


Step 3: Switch to Test Mode (Modify Mode)
If your device isn't already in test mode, use the Modify Mode software:
- Close ZK Tool if it's running (to prevent USB port conflicts)
- Launch Modify Mode software
- Select the correct USB serial port from the dropdown
- Click Open Port
- Enter the device's IMEI number
- Click Confirm - the software will automatically switch the IoT to test mode
- Close Modify Mode when complete
Video Instructions
See the Modify Mode video tutorial at the top of this page for a walkthrough of this process.
Step 4: Configure Server Settings with ZK Tool
Now you'll update the server IP and port using ZK Tool:
- Launch ZK Tool software
- Log in with the password: •••••sign in
This is the ZK Tool desktop password — not your device's AT command password
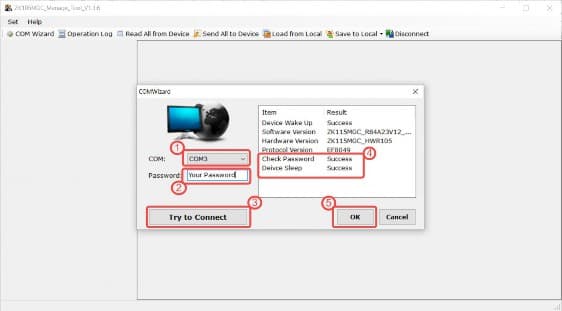
- Press Ctrl + L to open the command entry page
Screenshots Show Example Values Only
- Send the following commands to configure the server:
How to Tell a Command Worked
After sending each command, look at the Operation Log pane in ZK Tool. A successful command echoes back the command itself followed by an OK line. If you don't see OK, the command didn't take — recheck the IMEI, mode (must be TEST), and cable.
The AT password in these commands is per-device
•••••sign in is the OKAI factory default for most ES400-family IoT modules, but some devices ship with a different per-device password (for example •••••sign in). If a command echoes back without OK, look up the device's actual AT password under IoT Credentials on its vehicle page in the Levy Fleets dashboard (visible to super-admins), and substitute that for the default in every command on this page.
Fixed-Time Reporting Configuration
OKAI reporting-interval AT command — partner content
Sign in with your active Levy Fleets account to view.
This sets the device to report its position every 60 seconds during active operation.
Expected Operation Log output:
OKAI reporting-interval expected output — partner content
Sign in with your active Levy Fleets account to view.
IP and Port Switch Command
OKAI server-switch AT command — partner content
Sign in with your active Levy Fleets account to view.
This is the critical command that points the device to the Levy Fleets server.
Expected Operation Log output:
OKAI server-switch expected output — partner content
Sign in with your active Levy Fleets account to view.
The log should echo back the IP and port — if it doesn't, your command got truncated and you need to resend it.
Do Not Change APN Settings
Do not modify APN settings for this setup. The APN is pre-configured on the SIM card and changing it will break cellular connectivity. Leave APN values untouched — only the server IP and port need to be updated.
Step 5: Restart the Device — Required
Do Not Skip This Step
The previous commands only stage the new server config. The restart command (•••••sign in) is what makes it take effect. Without the restart, your device will keep talking to OKAI's server even though every command above returned OK. This is the #1 reason operators think the configuration "didn't work."
Send the restart command via Ctrl + L:
OKAI device-restart AT command — partner content
Sign in with your active Levy Fleets account to view.
Note: unlike the other AT commands, this one has no FFFF$ suffix.
The device will reboot and attempt to connect to the Levy Fleets server. You'll know it succeeded when the device appears online in your Levy Fleets dashboard within 30–90 seconds (see Part 2 below).
Optional: Reboot and Capture Modem Logs
Use this when support asks for OKAI modem logs or when a device still will not reconnect after the server settings above appear correct.
- Keep the IoT module connected to the Windows PC with the OKAI USB debugging cable.
- Open ZK Tool and log in with the desktop password: •••••sign in
- Press Ctrl + L to open the command pane.
- Send the restart command:
OKAI device-restart AT command — partner content
Sign in with your active Levy Fleets account to view.
- Watch the Operation Log pane while the device restarts and reconnects.
- Save or screenshot the log output and include the vehicle number, IMEI, SIM ICCID, and the exact time of the test when sending it to Levy support.
Do not leave the device in TEST mode
After debugging, return the IoT to normal mode before putting the vehicle back in service. If the device remains in TEST mode, it may not behave like a normal rental vehicle in the field.
Part 2: Verify Connection
After restarting, the device should connect to Levy Fleets:
- Wait 30-90 seconds for the device to reconnect (time varies based on cellular signal strength)
- Log in to your Levy Fleets Dashboard
- Navigate to Vehicles or IoT Devices
- Verify the device appears online with updated telemetry
Troubleshooting Connection Issues
| Issue | Solution |
|---|---|
| Device not appearing online | Wait up to 5 minutes, check cellular signal |
| Device shows offline | Verify IP and port settings, check battery level |
| Commands not responding | Ensure device is in TEST mode, check USB connection |
AT command echoes without OK | The default •••••sign in in the example may be wrong for this device. Look up the per-device AT password under IoT Credentials on the vehicle page in the Levy Fleets dashboard and resend with that value. |
Part 3: Return to Normal Mode
Once configured and verified, switch the IoT back to normal operating mode:
- Connect via ZK Tool with password •••••sign in (this is the ZK Tool desktop login — not your device's AT command password)
- Press Ctrl + L
- Send the mode switch command:
OKAI normal-mode AT command — partner content
Sign in with your active Levy Fleets account to view.
If •••••sign in echoes back without OK, substitute the device's per-device AT password (visible under IoT Credentials on the vehicle page) and resend.
The device will switch from TEST mode to NORMAL mode for regular operation.
Quick Reference: All Commands
| Purpose | Command |
|---|---|
| Switch to Levy Server | •••••sign in |
| Set Reporting Interval | •••••sign in |
| Restart Device | •••••sign in |
| Switch to Normal Mode | •••••sign in |
Port Reference
| Device Type | Server IP | Port |
|---|---|---|
| Omni (Generic) | •••••sign in | •••••sign in |
| Segway | •••••sign in | •••••sign in |
| OKAI | •••••sign in | •••••sign in |
| Queclink (ZK600) | •••••sign in | •••••sign in |
| ZIMO MQTT | •••••sign in | •••••sign in |
Common Issues
Device Was Never Connected to OKAI Server
If the device never communicated with OKAI's original server, it requires physical access to configure:
- Charge the vehicle fully
- Verify the SIM card is activated and has data
- Check the IoT module is properly connected to the ECU
- Follow the configuration steps above
Device Has 0% Battery
Devices with completely depleted batteries cannot receive configuration commands remotely:
- Charge the vehicle until the IoT module powers on
- Once online, follow the configuration steps above
- For bulk deployments, OKAI may be able to queue the IP switch command to execute when the device comes online
Multiple Devices to Configure
For fleets with many vehicles, contact Levy Fleets support at support@levyelectric.com to discuss:
- Bulk configuration options
- Remote configuration assistance from OKAI
- Pre-configured device procurement
Need Help?
Contact support@levyelectric.com with:
- Device IMEI
- Current device status (LED indicators)
- Any error messages
For OKAI-specific hardware issues, contact OKAI technical support directly.