BAC355 Batch Programming: Simple Windows Work Card
Use this card to program Levy's 200 ASI BAC355 controllers, one at a time at the factory. The Windows program is Little Updater Tool. A Simplified Chinese work card is available for the production team.
Remember the order: select the package → connect USB when prompted → connect and power the controller → wait for completion → power off and change units.
Download the Windows Tool and Current Complete Package
Download both files on the Windows computer that will program the controllers:
- Windows installer: Little Updater Tool v2.0.6 (17.8 MB).
- Current complete Levy update package (.zip), November 10, 2026: V59 reverse (147 KB).
This is the complete, ASI-signed replacement package, preserved unchanged. Its four matching files include the configuration .yml, ASI signature .key, firmware .ehx, and V59 reverse parameter XML for the factory-direction motors. The firmware remains 6.027 TTL. This November 10 bundle replaces the July 21 V25 package for this factory update.
Extract the ZIP, keep all four files together, and open LevyLittleUpdate20261110.yml in Little Updater. The matching V59 reverse XML is already inside; do not replace or rename any package file. Download checksums are available to verify both downloads.
1. Prepare the Station
- A Windows computer on its charger, with automatic sleep disabled. Run only one Little Updater instance per computer.
- Levy's supplied 24-pin TTL programming cable, shown below, with a USB isolator between the PC and the programming cable.
- The controller's battery power connection, or a technician-approved equivalent power supply. The controller must have separate power and be turned on. USB provides communications; it does not power or enable the controller.
- The Windows installer and the complete programming ZIP package confirmed by Levy for this batch.
Either Jack's team or Omni can carry out the update with this equipment and a Windows laptop or desktop PC.
The motor does not need to be connected for this firmware-and-parameter programming job. It does not run motor discovery or a motor test. With power off, individually insulate and separate any disconnected motor phase terminals before powering the controller. Connect the motor later for the complete-scooter checks in step 6.
Use the Complete November 10 Package
Use the V59 reverse ZIP linked above for this factory update, keeping all four files together. Do not substitute the phone guide's XML or an engineering test file. A parameter change requires a matching package newly signed by ASI.
Have a technician check wiring, power, and the enable method first. Do not guess connections from wire colours or improvise pin jumpers. If attached to a scooter, support the drive wheel clear of the ground. Do not operate the throttle or motor during programming.
2. Install and Extract Once per Computer
- Download and run the installer linked above: LittleUpdaterToolSetup_2_0_6.exe.
- Open Little Updater Tool.
- Right-click the programming ZIP and choose Extract All. Do not open the job inside the ZIP.
- Keep the
.yml,.key,.ehx, and.xmlfiles together in one folder. Do not rename or edit them.
3. Select the Configuration
Choose File → Choose Configuration File and select the .yml file from the confirmed batch package.
For the current complete package linked above, select LevyLittleUpdate20261110.yml. Complete the first-unit checks below before continuing the remaining batch.
Select .yml, not the parameter .xml or firmware .ehx. The job handles the firmware, parameters, and permanent save automatically.
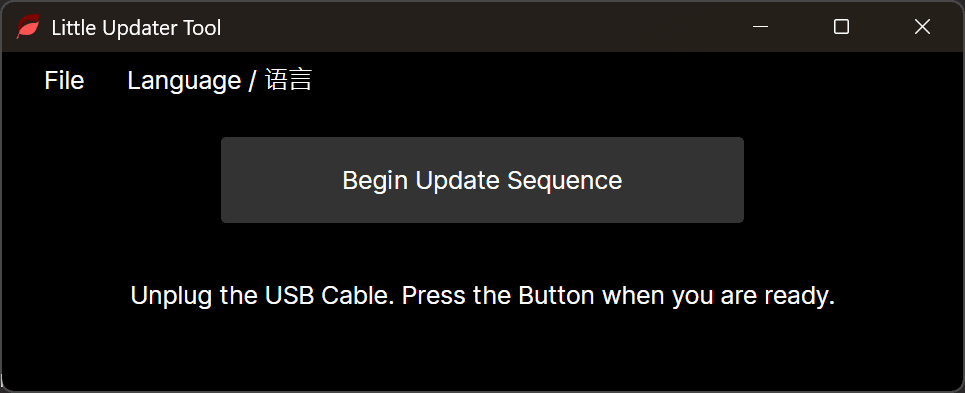
4. Follow the Connection Prompts
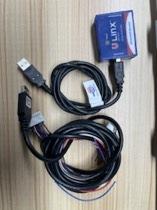
- Put the USB isolator between the computer and programming cable. Connect the controller’s separate battery supply using the station procedure. Leave the controller-side 24-pin programming plug out so the controller stays off.
- At Unplug the USB Cable. Press the Button when you are ready., unplug the programming USB from the computer, then click Begin Update Sequence.
- When prompted to insert USB, reconnect it. If the tool asks you to unplug and reinsert USB, do that at the computer end only. Leave the battery leads and 24-pin plug in place if they’re already connected.
- At Establishing Communication. Plug serial cable into controller and turn controller on., confirm the battery supply is connected, then seat the pictured Levy 24-pin programming plug in the controller. The plug activates Key-in as soon as it is seated, turning on the controller. No separate switch or OMNI unlock is needed with this cable. The motor may remain disconnected for programming.
With the regular scooter harness, unlock the scooter via the OMNI device to turn on the controller. For programming, use the Levy cable shown above.
If the controller LED stays dark, stop and confirm you have the pictured cable fully seated. Have a technician check battery power and the Key-in circuit. Do not improvise jumpers or change wiring to make it connect.
5. Wait for Completion
The tool checks the controller, updates firmware, writes parameters, and reaches Saving to flash.
Do not remove power, unplug USB or the controller, let the computer sleep, or operate the motor. “Updating firmware” and “Saving to flash” are still in progress.
Only if the tool explicitly requests Power cycle controller to continue, switch off and back on using the technician-validated station method. Do not restart during a write.
The completion screen should say:
Controller is up-to-date.
Plug in the next powered controller.
This ends the unit's update sequence. If the message appears immediately after connection, check whether that controller already has a passing record for this batch. The message alone does not establish that it has the current batch's parameters.
6. Validate 2–3 Controllers First
Complete 2–3 units first. Have a technician power-cycle them and verify firmware, parameters, and persistence, then install each in a complete scooter and check:
- Throttle response and wheel direction;
- Both brake inputs and cutoff;
- Display, lock/unlock, and anti-theft operation;
- Normal shutdown/startup with settings retained.
Continue the remaining batch only after all first articles pass, using the same package and validated station.
7. Change Units and Repeat
- Confirm completion, log the controller identifier, package version, date, and result, then mark the unit for the completed area.
- Power it off before disconnecting its interface.
- Connect the next unit, supply power and enable it using the validated method, and follow the tool's prompts.
Normally there is no need to select the configuration again or restart the application. Keep unprogrammed, completed, and abnormal units separate.
Screen Messages
| Message | Meaning / action |
|---|---|
| Begin Update Sequence | Start the update process |
| Checking / Updating firmware | Firmware check / write in progress; maintain power and connections |
| Updating Parameters / Saving to flash | Writing / permanently saving parameters; keep waiting |
| No sequence list found | The controller did not match this job's validation. Stop and check the controller and package; this is not a pass for the current batch |
| Error in Remote Echo | An expected bootload-mode reply was not received. Preserve the setup and power, photograph the error and LED state, and ask the technician; do not repeatedly retry |
| Remove controller from circulation | Abnormal unit. Safely power down under technician direction and segregate it from completed units |
For an error, record the controller identifier, full English message, and package name. Send Levy photos of the connections and controller LED. Do not change parameters or wiring, or use Firmware Recovery Attempt as the routine batch procedure.
For phone servicing, see the BACDoor Mobile guide. Reference: ASI Little Updater documentation.
Running a fleet on this hardware?
Levy Fleets runs scooters, e-bikes, mopeds and golf carts on the IoT hardware you already have, with integration pages for 29 vendors including Segway, Okai, Omni, Queclink, Invers and Comodule. Keyless unlock, geofencing, rider payments and rider support are included, and the Managed plan is a share of revenue with no per-vehicle software fee.